The Secrets Of Hot And Fast Cooking On Your Weber Smokey Mountain
[AMAZONPRODUCTS asin=”B001I8ZTJA” listprice=”1″]
Grilling and smoking are excellent ways of cooking meat. And what could be better than combining these two methods?
If you’re reading this, you’ve mostly likely already got a Weber Smokey Mountain.
It’s an exceptional choice of grill.
It’s great for both smoking and grilling, and it’s a good choice if you want to do both at the same time.
When we use our Smokey Mountains like this, though, it can sometimes take hours to get the meat smoked, tenderized and ready to eat.
But is there a way to cook that brisket before lunchtime without sacrificing flavor?
The good news is that there are numerous methods for smoking and grilling a brisket hot and fast on a Smokey Mountain grill.
To help you do this without sacrificing quality or flavor I’ve put together a little guide to let you in on some secrets.
But before we get stuck in, let’s take a look at why the Weber Smokey Mountain is such a great grill.
Why The Weber Smokey Mountain?
[AMAZONPRODUCTS asin=”B001I8ZTJA” listprice=”1″]
Weber is a prize-winning grill manufacturer.
For decades, this company has been blessing us grill enthusiasts with affordable grills in all shapes and sizes. Weber consistently promise and deliver quality, these are some of the best grills out there.
Their Smokey Mountain grill is primarily designed for low and slow cooking. Nevertheless, it’s not impossible to cook hot and fast on it. The oval design is perfect for reaching scorching-hot temperatures. Plus with the adjustable air vents, it’s easy to maintain this heat as well.
On the inside you’ll find a place for the charcoal at the bottom. Above that you’ll be able to fit a water tray in. This will help regulate the temperature as well as providing some much needed moisture.
The grill itself is easy to take apart. It comes in three pieces; you can even remove the middle section and transform it into a kettle grill.
Take out the center section, place the grates directly above the hot charcoal and, hey presto, you’ve got a hot and fast grill.
However, this is not always as convenient as it sounds. It might be perfect for cooking a medium-rare steak, but it’s a different story when it comes to something like chicken.
You’ll have to keep watch, as the direct heat can quickly become too much. So unless you know your temperatures and how to regulate them well, it’s better to keep the Smokey Mountain in its assembled shape.
BEST OF BOTH WORLDS
As I mentioned earlier, the Weber Smokey Mountain does bring the best of both worlds together.
Of course, it’s not the ideal smoker, as the temperature can be challenging to keep low. But for the price, it will easily beat the competition.
The Smokey Mountain’s design creates a good environment for smoking. The lofty shape and adjustable air vents allow for more vapor to build up inside. This will also aid in preserving the burning charcoal and help the coals stay alive for longer.
Usually, when you cook hot and fast on a grill, you’re sort of cheating yourself from gaining that smokey flavor. But, due to its design, you don’t have to compromise that crispy chicken skin to get the flavor you’re craving.
Do A Dry Run
I did agree to let you in on some secrets, and here is one: do a dry run and “season” your grill.
Many of my fellow grill aficionados will state that this step is unnecessary for today’s new grills. But I beg to differ.
By “seasoning,” I mean creating a layer of grease and soot on the inside of the grill.
Most of us, when buying a new kettle for example, do a few runs before using the water for our coffee. By boiling some water a few times, we’re rinsing out most of the dust and substances coming from the manufacturer. So why wouldn’t we do the same with our grill?
New grills look shiny and, well, new. This is good when you want to impress your nosy neighbor, but not so much for your cooking, especially if you’re planning on doing it hot and fast.
When a grill comes from the factory, it’s almost too clean.
Ideally, you’d want to build up a layer of grease on the inside, i.e., season it.
This will enable you to keep a regulated temperature to avoid excessively charing your meats while cooking hot and fast.
Dry runs have two phases. If your Smokey Mountain is new, I’d recommend following these two steps to ensure your cooking is successful.
PHASE ONE
Begin by covering the water pan with some foil, but hold the water for now.
Then start loading your grill with charcoal briquettes and let the temperature rise as high as possible. Leave the charcoal to burn out and then remove them to begin phase two.
PHASE TWO
For phase two, fill half of the charcoal basket with unlit briquettes and add half a chimney filled with lit charcoal. Get your grill to about 275 degrees Fahrenheit and leave it for three to five hours.
Get some of the leftover fatty meat cuts (which you’re not planning on eating) and throw them on the grill. Add some smoky wood, repeat this step a few times, and your grill should be seasoned nicely.
Which Meats To Cook Hot And Fast
Cooking is, in many ways, a process which allows you to be creative and try new methods and tricks.
But when it comes to products such as meat and poultry, you should follow a specific protocol to ensure it’s safe to eat.
Chicken is the best meat to cook hot and fast and still get a great flavor and crispy skin. As opposed to pork or beef, chicken is from a much smaller animal, which means the meat is easier to tenderize.
Due to its size, it will also cook a lot quicker.
But when grilling a chicken hot and fast, you should watch the temperature of the meat. One drawback of fast cooking is that, sometimes, you’ve burnt the outside, while the inside remains uncooked.
The temperature inside the chicken should be at least 170 to 175 degrees Fahrenheit in the leg, and 161 to 162 degrees Fahrenheit in the breast. Not overstepping this temperature will also ensure that the meat isn’t dry or overcooked.
Now, on to briskets.
Rushing the cooking procedure of this cut won’t end well. The long, slow cooking time is ideal to let all the fat melt through the meat to give it a silky, melt-in-the-mouth texture.
Truthfully, the quickest way to rush this process is by boiling it, but that would ruin the taste.
But once again, as I promised some secrets, I will guide you through two bullet-proof ways of cooking butterfly chicken and brisket, hot and fast.
Please note that brisket can be tricky, so it could take some trial runs before getting the perfect texture. But don’t fear, Rome wasn’t built in a day, and the same goes for your cooking experience.
HOW TO COOK CHICKEN HOT AND FAST
Method
- A whole chicken will take more time to cook. So, in order to do this fast, butterfly the chicken by halving it and cutting out the backbone
- Season the skin with your desired rub. If you feel sure about your skills, you can add some sugar, but otherwise, leave it out, as it can burn and turn bitter rather quickly
- Get your Smokey Mountain grill hot. Place a full chimney of burning charcoal in the bottom of your grill and add an additional half chimney of unlit briquettes on top
- When a layer of ash is covering most of the charcoal, you’re ready to cook. The temperature should stay at 310 to 312 degrees Fahrenheit. Leave the water tray ou
- Place your chicken, skin-side down, on the grates and cover with the lid. You could add a few lumps of wood to the charcoal to get a smoky flavor. They should be small pieces and have a mild scent, such as apple or cherry
- Regulate the air vents. On your Smokey Mountain, there are three air vents. Two at the bottom and one on top. These should be fully open throughout the process
- Cook the chicken for 30 minutes on one side and turn for an additional 15 minutes of cooking, making it 45 minutes of total cooking time
- After you’ve flipped your chicken, turn the grates about 180 degrees to even out the hot spots. During the last five minutes, add your favorite grilling sauce on top. Take the chicken off the grill and let it rest a few minutes before serving
HOW TO COOK BRISKET HOT AND FAST
Method
- Prep the meat with a dry rub and let it rest while you heat the grill
- Get your grill ready by following the steps explained above. However, for brisket, you’ll want to add more pieces of smoking wood. This piece is going to take a little longer than the chicken, so more fuel is needed. The temperature should be around 325 to 375 degrees Fahrenheit
- Place foil inside the water tray and place it back into the grill. You won’t be adding any water. Instead, it’ll work as a drip pan. Letting juices and fat reach the hot coals means you’re compromising the taste
- Once the temperature is ready, place your brisket fat-side down onto the grates. Open up all the air vents for the first half of the process. During the first hour, you should see a lot of smoke. But keep an eye on it because when it subsides, you’ll have to regulate the temperature
- Once the temperature is ready, place your brisket fat-side down onto the grates. Open up all the air vents for the first half of the process. During the first hour, you should see a lot of smoke. But keep an eye on it because when it subsides, you’ll have to regulate the temperature
- This is where you have to work fast. If you notice the temperature drop, close one or two air vents and shake up the coals a bit
- After about two hours, check the temperature of the meat. When it reaches 170 degrees Fahrenheit, take it off the grill and place it in a heavy-duty foil pan, fat-side up. Cover it with aluminum and put it back on the grill
- This will enable the fat to melt through the meat, tenderizing it and ensuring a smooth texture. One problem when cooking brisket hot and fast is that the fat won’t have time to melt properly. Without the melted fat through the meat, it will dry up as soon as you cut into it. Plus, you’ll have a very unappealing layer of gooey fat under the crust
- After another two hours, check the brisket temperature. It should be around 205 degrees Fahrenheit. But you should also check the tenderization. Try pulling a fork through it, if it goes through without resistance, you’ll know it’s good to eat
- If it feels a little tough, you could leave it a bit longer. But do regular checkups to make sure it doesn’t overcook. The advantage of wrapping it in foil is that you’re able to cook at high temperatures for longer. However, it won’t prevent drying out completely, so keep your eye on the meat
- Once it feels ready, take it off the grill. Let it sit, covered, in the foil pan and allow it to rest for at least 30 minutes before you cut into it. After 30 minutes the brisket should be ready to eat. You can trim it down if you like, by removing the flat underside
This process will take about four hours, depending on the size of your meat. But it’s a sure time-saver when compared to the usual five to ten hours.
Conclusion
Now you know some of the inside details on how to cook hot and fast on your Weber Smokey Mountain.
It’s essential to get your grill ready by doing a dry run and make sure you choose the correct products to grill hot and fast.
We’ve gone over chicken and brisket, but you can try the hot and fast cooking methods with other meats on your Weber.
Take your time getting the hang of everything, experiment a little bit. After all, it’s always good to do a few trials beforehand, to make sure that the grilled food you promised your guests is as delicious as they’re expecting.
Make your first smoke on a Weber Smokey Mountain a success with these 8 tips
So you have picked up a new Weber Smokey Mountain. It’s all unpacked and ready to go. Or is it?
With a bit of practice you’ll be churning out delicious rib, butt and brisket.
To get you there faster we’ve pulled together 8 tips from seasoned pitmasters to help you get the most out of your new smoker as you learn how to use it.
From what to do before you cook, to how to light your Weber Smokey Mountain for the very first time, right through to some insights from the pros about how to deal with quirks of the Weber Smokey Mountain, we have it all covered in this guide.
Read more: Weber Smokey Mountain Cooker Review
[AMAZONPRODUCTS asin=”B001I8ZTJA” listprice=”1″]
1) Get to know your new smoker with a dry run
You won’t have to look for very long to find articles online that insist that there is no need to fiddle around with dry runs. But let’s have a look at a couple of reasons why we think it is a good idea.
Meathead Goldwyn of Amazing Ribs has this to say:
Meathead Goldwyn, The Best Setup And Accessories For A Weber Smokey Mountain Barbecue Smoker
“The first thing to do after you assemble your new grill or smoker is to season it and calibrate it by doing a few dry runs without food.
This will burn off any manufacturer’s grease, and give you a sense for how to set it up to hit the two important target temps that almost all my recipes use: 225°F and 325°F.”
Seasoning refers to creating and leaving a layer of grease and soot on the inside of the smoker. This is achieved by conducting a dry run.
Seasoning your smoker has a couple of benefits:
- It ensures there is an airtight seal around the lid of the barbecue, meaning the temperature is much easier to control.
- It also rectifies a common problem with new smokers. New units are nice and shiny, which might look impressive, but in reality, it means that the temperatures inside the unit run high due to the heat bouncing around off this reflective surface.
- A layer of grease and soot makes the surface less reflective. Once this initial shine is taken off the inside of the unit, you will find it much easier to maintain consistent temperatures.
According to Harry Soo of Slap Yo Daddy BBQ, a successful team from California who are a regular feature of the barbecue competition circuit, seasoning your Weber Smokey Mountain is best done in two phases.
Phase 1:
- Cover the water pan with foil.
- Fully load your Weber Smokey Mountain with charcoal briquettes, and without any water in the pan, let your smoker run as hot as possible. This will get rid of any grease left over from the manufacturing process.
- Clean out the ashes, and you’re ready for the next phase.
Phase 2:
- Half fill the charcoal basket with unlit briquettes. Add ½ a chimney of lit briquettes to a well in the center. Your goal is to get the smoker to about 275oF, and run it for about 3-5 hours.
- Throw some fatty scraps of meat that you don’t plan on eating onto the grill plate. Add a couple of lumps of wood to create some smoke.
- Repeat this process a couple of times before you cook the meat you actually plan to eat. This will ensure there is a nice layer of grease seasoning on the inside of your cooker.
A layer of grease should not be confused with a dirty cooker. Your aim is not to create a buildup of creosote and rancid fats. They will adversely affect the quality of your cook. Clean these off the inside of the dome with a grill brush, leaving only the layer of grease.
A couple of dry runs will also give you the opportunity to become familiar with controlling the temperature inside your smoker.
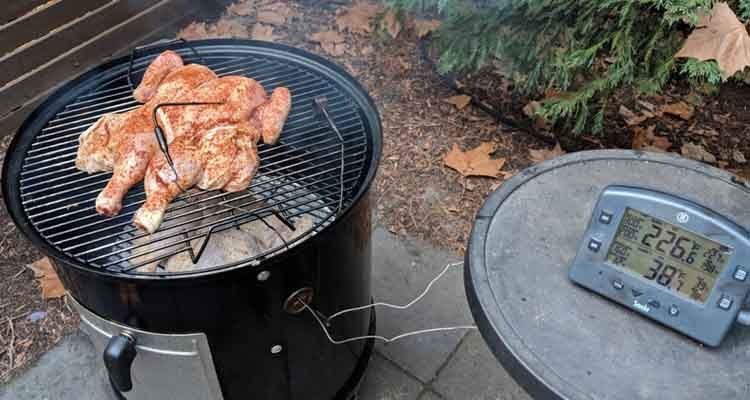
It is a good idea to purchase a digital thermometer.
The standard issue thermometer that will come installed in your Weber Smokey Mountain measures the temperature in the dome of the cooker, as opposed to the grate, where the meat is actually sitting.
A couple of dry runs give you the chance to fiddle with the vents, take note of the temperature changes, and practice starting up your smoker, without the worry of ruining any meat. This will ensure future barbecuing success!
2) What to smoke the first time using your Weber Smokey Mountain
Your new smoker is all seasoned, and you have a handle on how to control the temperature. Time to cook.
But what?
If you want to get results, and fast, then chicken is a good option. You will get to taste the fruits of your labor in under 2 hours.
Virtual Weber Bullet is a great online resource dedicated to cooking with a Weber Smokey Mountain. You can find a recipe for Hot and Fast Chicken there, along with some tips as to how to get delicious barbecue chicken skin.
I smoke a lot of chickens this way, and always use my trusty Smoke to keep an eye on temperatures.
If patience is one of your many virtues, and you’re are feeling confident in your ability to handle the temperature of your new cooker, then pork butt is a great choice for your first cook.
Taking roughly 8-12 hours, it will give you an authentic introduction to the low and slow experience.
The fatty cut is also hard to mess up, and can withstand temperature spikes much better than brisket or ribs.
You can find a beginners recipe here.
3) Get everything ready before you fire your smoker up
Before you fire up your smoker, there is a little bit more preparation you need to do to make your first cook a success.
First of all, your unit needs to be clean. If this is your first cook after seasoning, then this isn’t a concern. If you have managed to snag a second hand barbecue, this is something you will have to attend to.
Cleaning doesn’t have to be difficult:
- Tip out any ashes
- Empty and clean the water pan
- Brush off any loose material from the lid and cooking area
- Clean the cooking grates. Often, simply cleaning them off with a grill brush will do the trick. If they are quite dirty you might need to wash them with warm soapy water.
Prepare your meat before you even think about firing up your barbecue. You will be busy checking and adjusting the temperature once you have fired up the unit, especially if this is one of your first cooks.
You can apply the rub just before starting up your barbecue, or if you are really organised, apply the rub to your meat the night before your cook.
The last step before you fire up is to make sure you have everything on hand for the cook. Meat, rub (if you haven’t done this already), smoking wood, and charcoal at the very least.
It is also worth taking a minute to check that you have your chimney, starter, and any thermometers that you plan to use, on hand.
Also, have a fire extinguisher handy. Of course, some kind of emergency situation isn’t part of the plan for your first cook, but stranger things have happened…
4) Starting your Weber Smokey Mountain using the Minion Method
If you want to cook low and slow (4+ hours), the standard method for firing up the Smokey Mountain isn’t ideal
If you follow Webers instructions, you’ll need to refill charcoal every 4 hours or so.
There are a variety of ways you can light your barbecue, but the Minion method is a very reliable way to setup any charcoal smoker for a low and slow cook.
There is no need to add fuel throughout the cook, and there is less chance of the cooker becoming hotter than you want. Taking all this into consideration, the Minion method is a good option for beginners.
Check out T-Roy Cooks YouTube video to see how he does it.
The basic Minion method goes like this:
1. Fill the coal ring with unlit briquettes
Many experts say that Kingsford Charcoal Briquettes work best for long, consistent burns in a Weber Smokey Mountain. At the end of the day, however, the brand you decide to use is entirely up to you.
[AMAZONPRODUCTS asin=”B00HY03XGW” listprice=”1″]
2. Light some briquettes in your chimney starter
Take into consideration the weather. On a warm day, around 20 briquettes should be enough to start your fire. On a cooler day, consider lighting 20-40, and if it is freezing, you may need to light up to 60 briquettes.
If you a lighting a small amount of briquettes, flip your chimney upside and light them in the smaller end of the chimney.
3. Put the lit coals in the cooking chamber
Spread the lit coals over the unlit coals in the charcoal chamber. Put your cooker back together, and you’re ready to go.
There’s a bit of controversy around using unlit briquettes.
The Virtual Weber Bullet, Firing Up Your Weber Bullet
If there’s any controversy about the Minion Method, it’s that it contradicts the conventional wisdom that says all charcoal briquettes must be fully lit and covered with gray ash before cooking begins.
Everyone knows how bad charcoal briquettes smell while lighting, so some people assume that this smell permeates the meat during cooking, since fuel is lighting continuously over many hours.
Interestingly, the Minion Method does not seem to affect the appearance, aroma, or taste of food, and it is used with great success by many winning teams on the competition barbecue circuit.
All the times we’ve cooked with this method we’ve never noticed any effect on the smell or taste, so we say go ahead.
5) Make clean up easy by lining the water pan with aluminum foil
A useful tip is to line your water pan with aluminum foil. This will make the clean up a little quicker and easier, especially after cooks in which the water pan has not been filled.
Just wrap your pan, place it in the smoker like usual. Then when you’ve finished cooking and everything has cooled down you can scrunch it up and chuck it straight in the trash.
If you choose to line your pan with foil, moisture will get trapped between the foil and the pan. This will leave some discolouration in the water tray that cannot be cleaned up.
While this may be a little unsightly, it is not something that needs to be cleaned off. So you need to decide if some discoloration in your water pan bothers you.
6) Dealing with temperature variations
While the Weber Smokey Mountain is known as a well built, reliable cooker, there are still a couple of quirks to keep in mind regarding temperature control. The good news is, they can be overcome.
The door on the Weber Smokey Mountain is a little flimsy and doesn’t seal all that well.
There are few solutions to this issue:
- Usually, you only need to adjust the bottom vents to control the temperature, but if the leaky door is causing issues, you can try adjusting the top vent as well.
- Seal the door with high quality gaskets, using food safe adhesives. Make sure everything you use will not melt at high temperatures.
- Replace the door completely with a better fitting, heavier duty door.
Over time it will become easier to control the temperature of your cooker, as grease and carbon builds up and seals your cooker.
Keep in mind that on a hot day, your cooker will tend to run hotter. Conversely, on a cool day, it will run cooler.
If you’re still struggling to control temps:
- Check that the wind is not blowing directly into the vents. The extra supply of oxygen will stoke the fire and make it burn hotter.
- Don’t take the lid off your cooker thinking it will bring the temperature down. This will only serve to supply more oxygen to the fire and make it burn hotter and faster.
- And a final piece of advice, don’t be overly concerned about the odd temperature spike. This will naturally happen through the course of the cook.
7) Cook to temperature, not time
Smoking charts like this are a good place to start, but you shouldn’t rely on them.
It is worth investing in a good quality thermometer to measure the temperature inside the cooker and the temperature of the meat itself.
As we have discussed, the thermometer that comes installed in the Weber Smokey Mountain measures the temperature in the dome, not at the cooking grate.
How much the temperature varies from the dome to the cooking grate depends on a few factors, such as the temperature outside, or whether your Weber Smokey Mountain is sitting in direct sunlight or not.
To make sure you get an accurate reading, place a thermometer probe about an inch away from the meat, whilst not touching the grate. Keep in mind that any meat on the lower grate will be a few degrees cooler than the meat on the top grate.
When using a meat temperature probe, make sure it is not in contact with the bone once inserted into the meat. Thread any cables through the top vent hole.
8) Don’t overdose on wood
It is worth keeping in mind these words of wisdom from Meathead Goldwyn:
“There’s always the risk of oversmoking, so until you really know your machine, don’t add any more wood.”
Too much wood will lead to an undesirable, overly smokey taste, so resist the “more is more” mentality. As a guide, 2-6 fist sized chunks of wood is a good amount for the entire cook.
Wrapping it up
Now that you are all clued up on how to use your Weber Smokey Mountain, it is time to get out there are have a go! We hope you have found these tips on how to make your first cook a success useful.
Pitmasters love using the Weber Smokey Mountain. A few tips and tricks from the experts go a long way to making even your first few cooks a success.
Do you have any further tips for using the Weber Smokey Mountain? Are you a beginner, and still have some questions we haven’t covered in this post? Add them to the comments below.
If you have found this article helpful, make sure you share it with your friends.